
Pinterest is like another social network site used for collecting images in the form of Pins and Boards. Based on users interest. Pinterest will display images to the user’s dashboard.
A Pin is an image that has been linked from a website or uploaded. Pins saved from one user’s board can be saved to someone else’s board, a process known as repinning.
You can create as many boards for your pins as you want.
Pinterest is free to use, but the user needs an account to start using it.
In this blog, I will be using Pinterest images as my blog images, which I believe can be a great tool for the bloggers with low bandwidth space.
User can create a free account at Pinterest. Click on the Sign Up link at the bottom of the Login page and enter your email and password, or you can simply choose to create from your existing Facebook or Google account. After creating account the user will be asked to fill out few more details like Name, Age, Gender, Language, and Country. After then the user will be instructed to pick at least five categories to follow.

Steps to Create Pin and Board on Pinterest.

Step 1 – Login to your Pinterest account by entering the Email address and Password and click on the Log in button. You can also directly login (using Single Sign on) by using your Facebook or Google credentials.
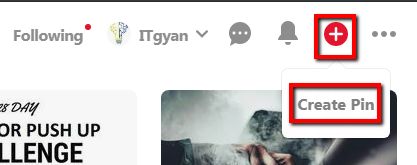
Step 2 – Now Click on the + icon near the three (…) dots. Then click on the Create Pin.
Step 3 – The below Upload Pin page will appear. On this page, you will find various ways to Pin (Upload) an image by Upload image(s) or you can directly find an image from the website by clicking on the Save from Site button. You are also required to create the Board for the pins to be published. Boards are the collections of pins dedicated to a theme such as quotations, travel, or weddings. Boards with multiple ideas can have different Sections that further contain multiple pins.

Step 4 – To create the Board, select the drop-down, near the “Publish” button.
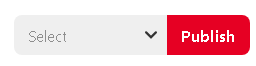
You will see Create board button in the drop-down. Click the “Create Board” button.

Enter the Board name and click on the Create button. To keep the Board Secret, select the Visibility option checked.

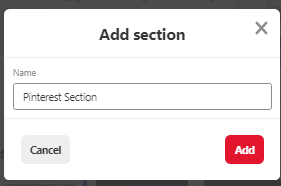
Step 5 – You can create further section(s) in the existing Board. Click on the Board on the dashboard.
Click on the + icon on the Board area. The below screen will appear.
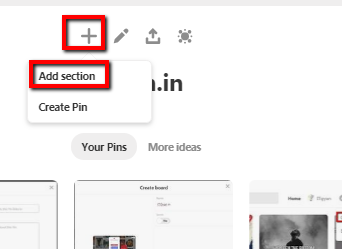
Give a name to the section and click on the Add button.
Step 6 – You can Upload your images by the click on the Upload area or can directly drop your images to the upload area. Give a Title to the Pin and give some other information relevant to the pin (Not mandatory).

Step 7 – The pins can be published immediately, or the user can set the later date by choosing from options below:
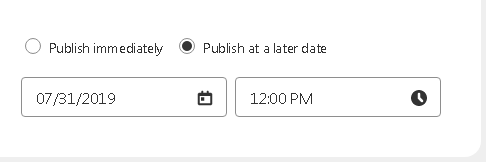
- Publish immediately:- On selecting Publish immediately, the image or pin will be published immediately when the user clicks the Publish button.
- Publish at a later date:- On selecting ‘Publish at a later date’, the two new date and time fields will be shown. You can select the Date and Time at which you want your pin to be published.
Step 8 – After Publishing, the below information screen will appear. You can see your image by clicking on the “See it now” button at the bottom of the page.

Step 9 – The below screen will appear, here you will see similar images to your’s, under More like this section.

To edit an image, you can click on the Edit icon at the top left as shown below.

The below screen will appear, here you can change information and click on the Save button. If you want to delete the pin, you can click on the Delete button.

To share the image at the various platform, you can click on the Send button.

By clicking on the three dots (…), you will see below options:

Download:- This will download the image at the default download location.
Report Pin:- This will lead you to the below screen where you can report the pin for various reasons and then click on the Next button. If further description is required for the reported reasons, the information will be collected in the next screen and then you can submit your reported reasons.

Embed:- This will open the Developers screen in the new Tab, where you can find the Pin URL, set the Pin Size and the embed link to paste it in your page.

To go back to the previous screen, click the Left arrow icon.

In the Upload pin page, you will see three dots (…), if you click this you will find below two options:

Delete:- This will delete the image without any confirmation.
Duplicate:- The duplicate area will be created and the same image will be shown in the next upload area.

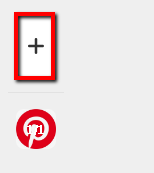
To create more Upload areas, you can click on the + icon on the top left.
To upload more images in the same area, you can click on the Create carousel icon. The new upload area will display on the same location.

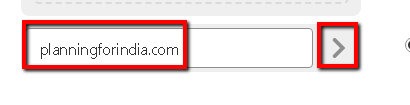
To Save the pin from any web-page, you can click on the Save from site button.

The below text-box will appear, here you can enter the site name and click the > icon.
The images from the web-page will be shown, now you can select an image and click on the Add to Pin button.

When you have uploaded the images in various text areas, you will see a large selection box on the right side of the Pin.

By selecting these you can Edit, Delete or Publish multiple Pins at once.

If you are still facing any issues, you can also view the video on Youtube.