Check TPM on computer: After the much-awaited Microsoft Window 11 operating system launch event, people wondered when and how the new Windows 11 OS would be available to its users for installation.
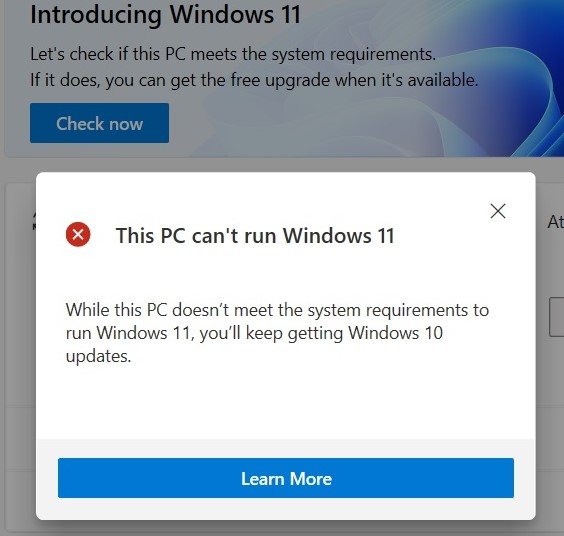
Several users see the “This PC can’t run Windows 11” error when running compatibility checks using Microsoft’s PC Health Check Tool. There seems to be some confusion around this app, and some people are reporting “This PC can’t run Windows 11” errors. Many users have reported problems when running compatibility tests with PC Health Check Tool, usually because of TPM 2.0 requirements and existing software or hardware issues.
Minimum system requirements
| Processor | 1 gigahertz (GHz) or faster with 2 or more cores on a compatible 64-bit processor or System on a Chip (SoC) |
| Memory | 4 GB RAM |
| Storage | 64 GB or larger storage device |
| System firmware | UEFI, Secure Boot capable |
| TPM | Trusted Platform Module (TPM) version 2.0 |
| Graphics card | DirectX 12 compatible graphics / WDDM 2.x |
| Display | 9” with HD Resolution (720p) |
| Internet connection | Microsoft account and internet connectivity required for setup for Windows 11 Home |
TPM requirements
Windows 11 is designed for everyone and compatible with modern hardware, so naturally, it will run smoothly on PCs shipped in the last few years, but it can be installed on older hardware.
Regarding the TPM requirement, Microsoft officials explained that PCs shipped in the last few years come with the TPM 2.0 feature. It’s possible that your PC does have TPM, but it’s disabled in the BIOS. If it’s disabled, you need to get into the BIOS, turn on TPM manually, and reboot the system.
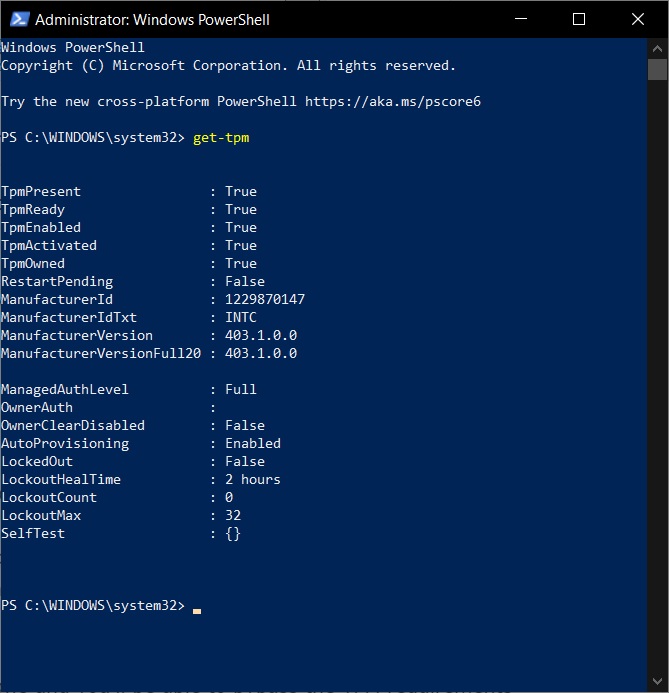
You can check if your device has the compatible TPM by running the command get-tpm in PowerShell:
Confirm TPM 2.0 with Windows Settings
To check whether your device has a TPM chip and is enabled, use these steps:
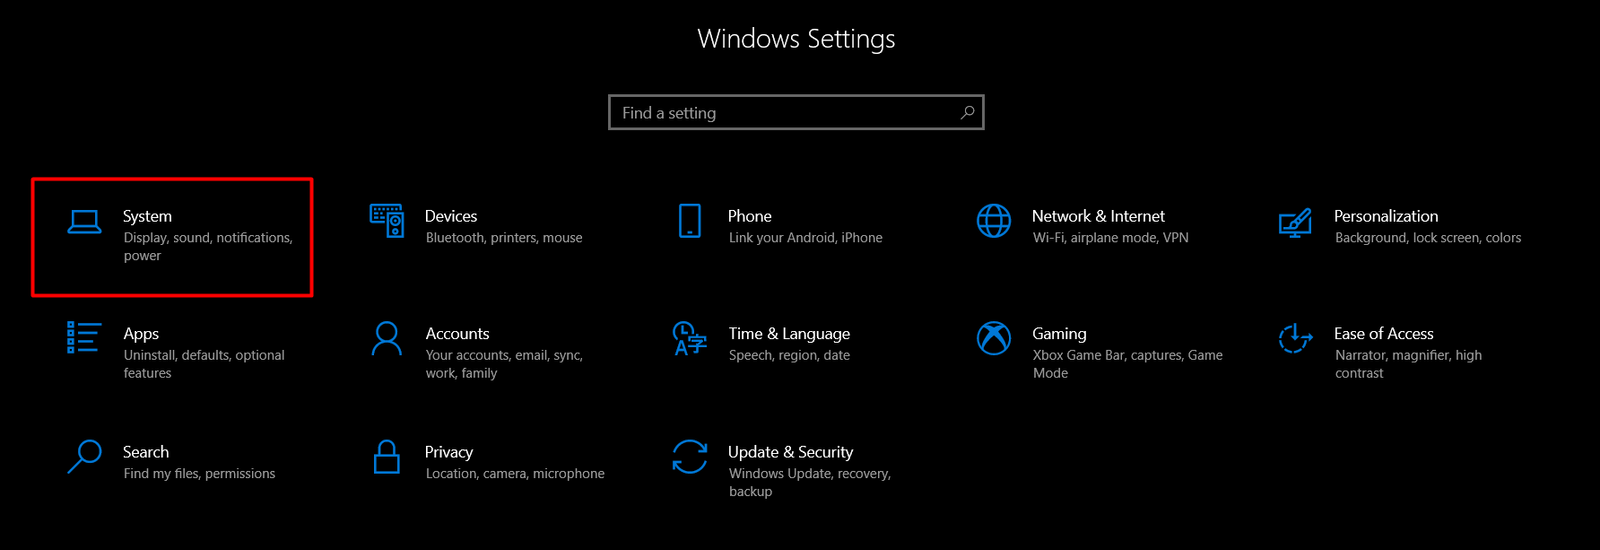
- Open Windows Settings.
- Click on System.
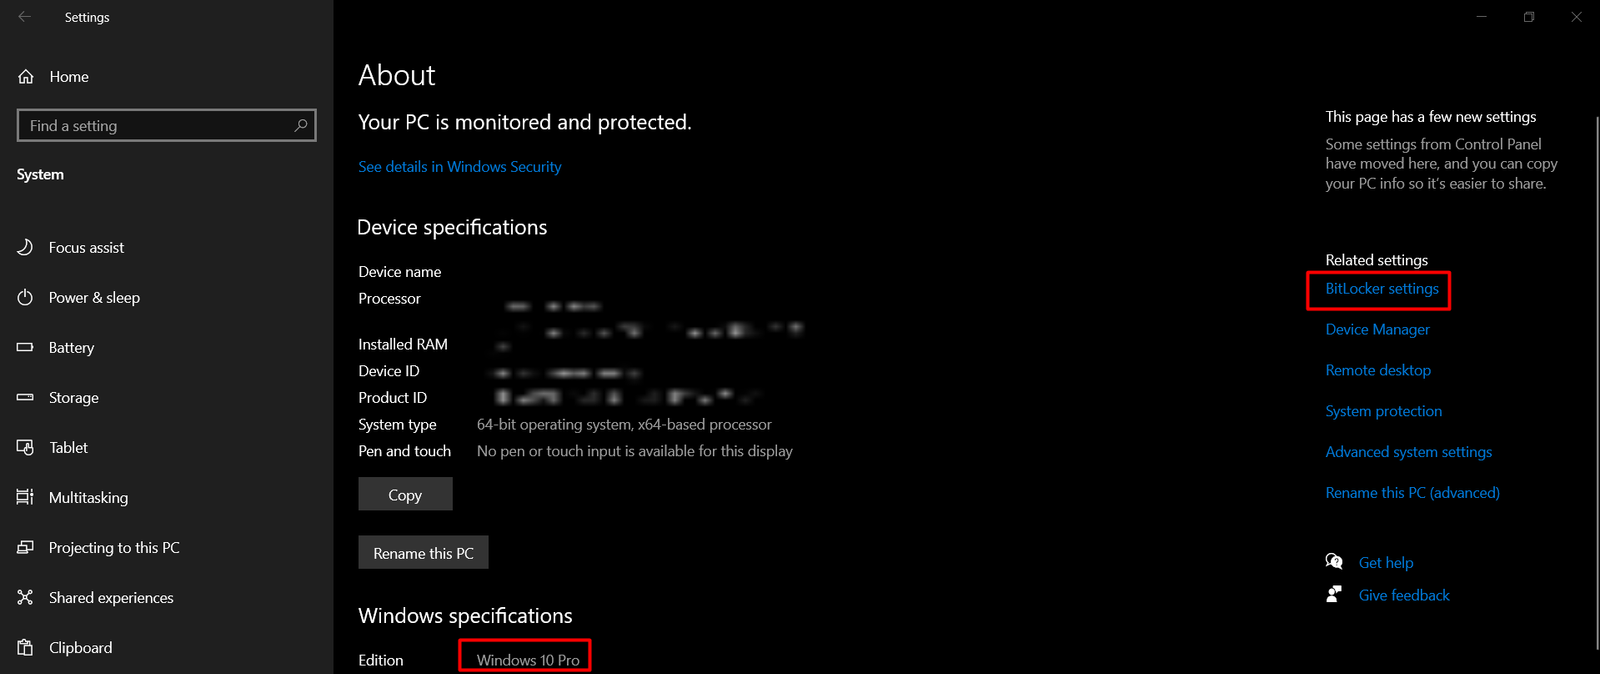
- Click on About.
- Under the “Related settings” section, click the BitLocker settings option.
- You will find TPM Administration, when you click it TPM Management window will open.
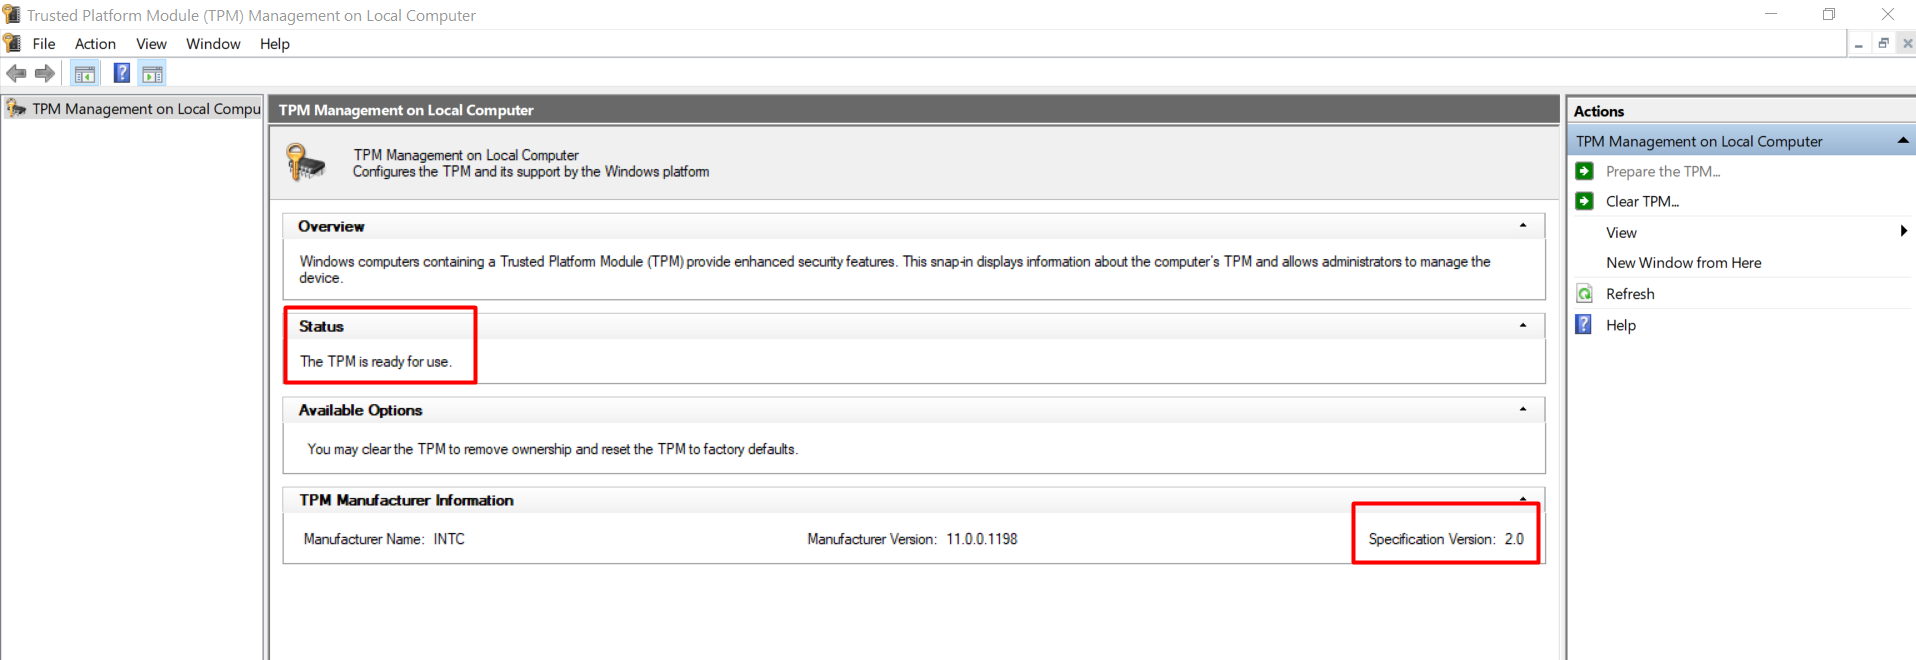
- Under the “Status” section, confirm “The TPM is ready for use” to confirm the device has a trusted platform module, and it’s enabled.
- Under the “TPM Manufacturer Information” section, check the Specification Version to confirm the chip is version 2.
Confirm TPM 2.0 with Device Manager
To check if a TPM chip is present and enabled with Device Manager, use these steps:
- Open Start.
- Search for Device Manager and click the top result to open the app.
- Expand the Security devices branch.
- Confirm the Trusted Platform Module 2.0 entry exists.
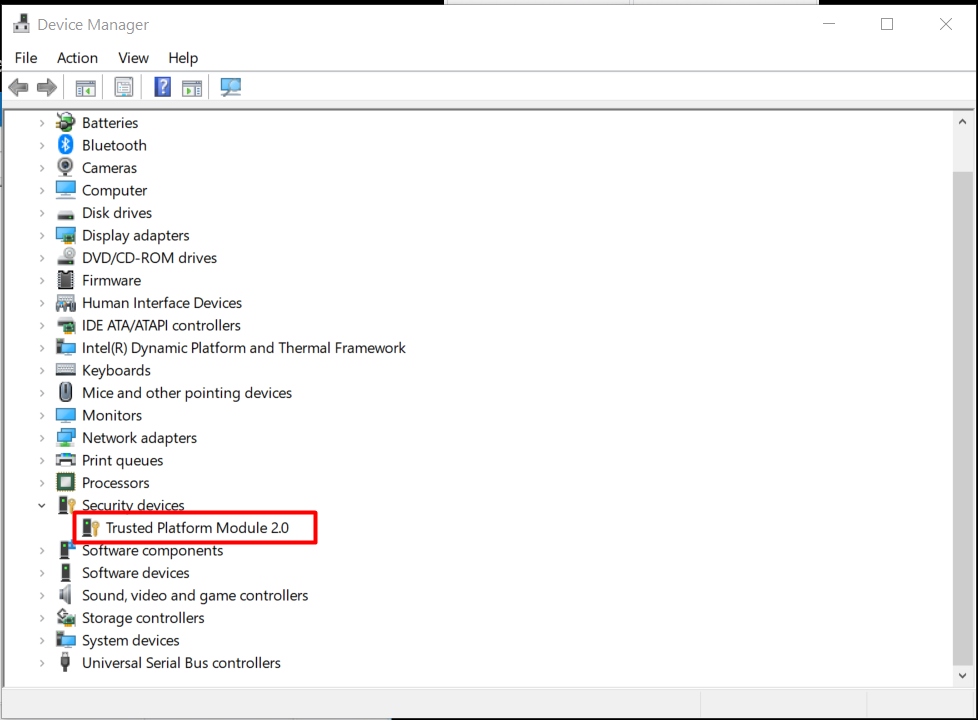
After you complete the steps, similar to using the Settings experience, you would have confirmed if the device enabled a TPM chip.
The other ways to find out if your PC has a TPM chip.
- Click Windows + R
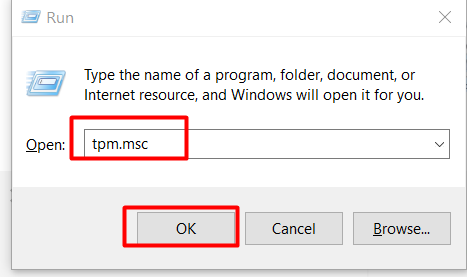
- Type in ‘tpm.msc‘ and click OK or hit Enter. The TPM Management window will open.
- Look for confirmation or a “Compatible TPM cannot be found” error.
- If you get the latter, you may still have a TPM chip, but it may need to be enabled in BIOS (We recommend contacting your manufacturer).
Steps to Check if Your Computer Has TPM Hardware That’s Disabled
On some PCs, it’s possible to disable the TPM chip in the computer’s UEFI firmware or BIOS. If the TPM chip is disabled at this level, it’s deactivated and won’t appear in Windows—even though your PC has the hardware. Restart your PC into its UEFI or BIOS settings screen to check for this. The exact process is different on every PC. But overall, you can follow the below steps:
- Restart the system to enter the BIOS setup screen. (These settings can differ for different manufacturers)
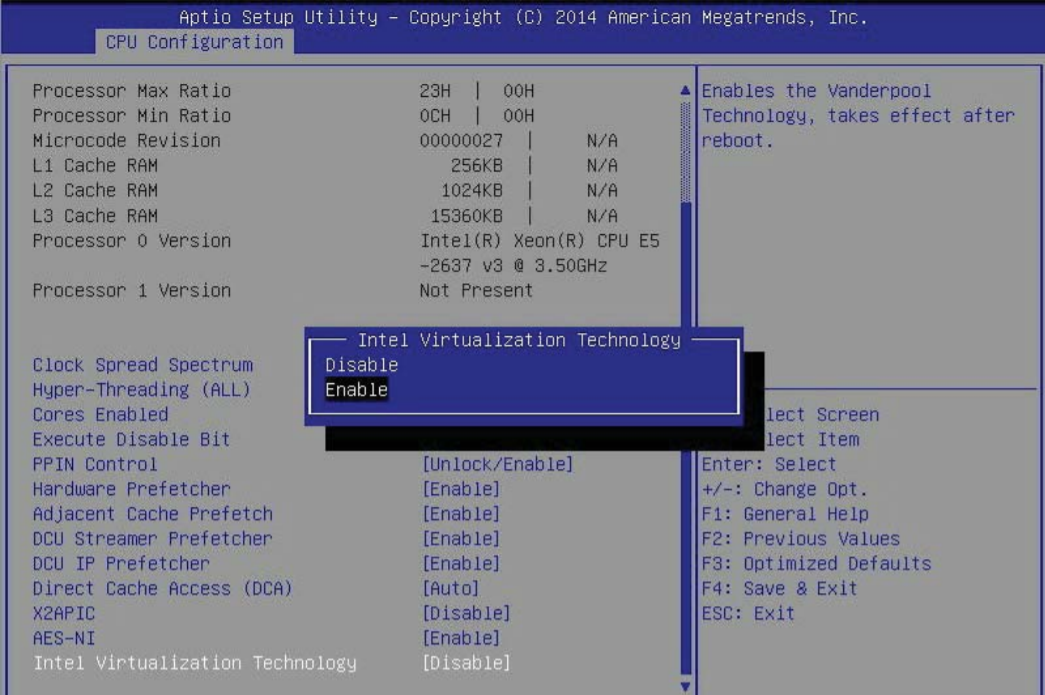
- You will be presented with the BIOS Setup main screen. Using your arrow keys, navigate to the Advanced tab. From there, navigate down and select the “CPU Configuration” option, as shown below. Press Enter key.
- You will be taken to the CPU Configuration page. Using your arrow keys, navigate down to the “Intel Virtualization Technology” option, and press Enter key. If this item is not already enabled, select “Enable” and press Enter key.
- Once you have enabled virtualization support, press your ESC key until you are back to the Advanced tab. Navigate down to the “Trusted Computing” option and press Enter key.
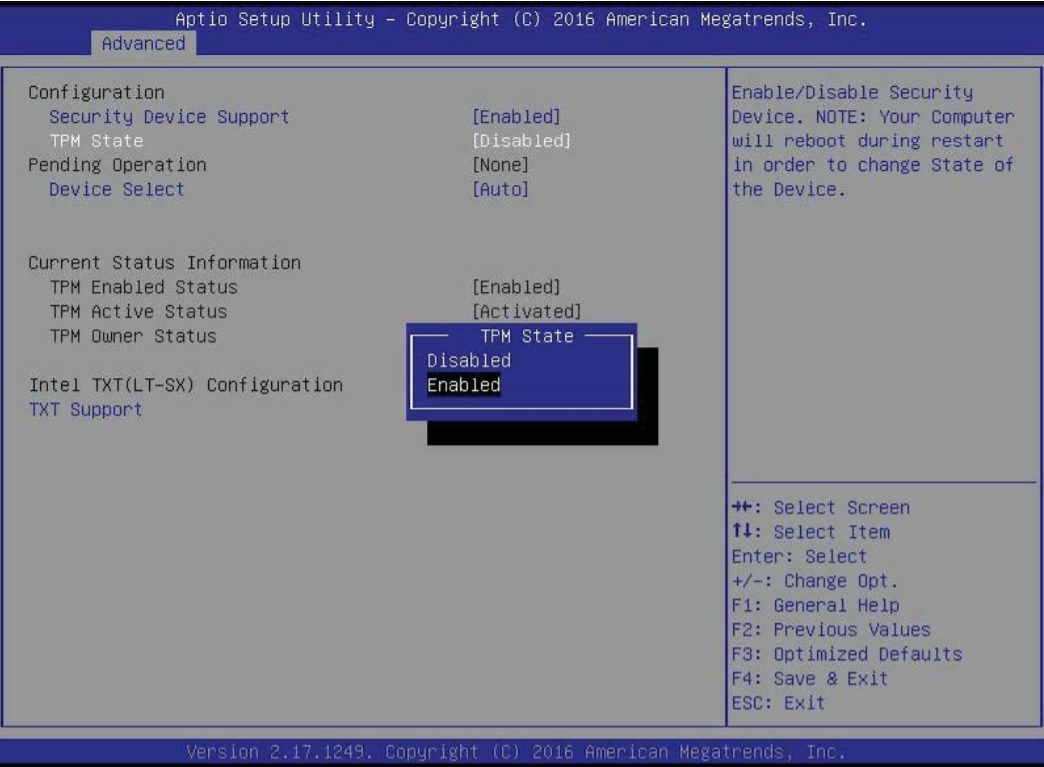
- The Trusted Computing window will appear. Select “TPM State” and press Enter key.
- From the window that pops up, select “Enabled,” as shown below, and press Enter key.
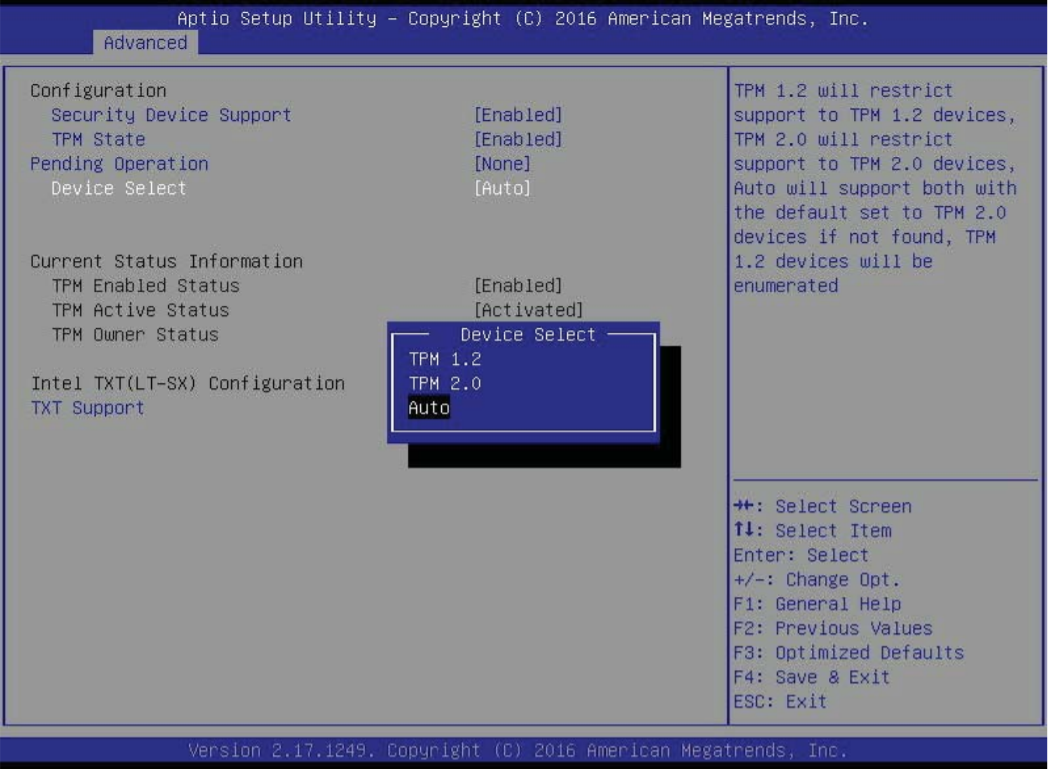
- Next, select “Device Select” Selecting the TPM 1.2/TPM 2.0 options will bypass any possible compatibility issues between the module and the motherboard. Selecting Auto will have the system auto-detect the model of TPM being used.
You must save your changes and reset them for the changes to take effect. Press the ESC key to exit the Trusted Computing options and scroll to the Save & Exit tab. Select “Save Changes and Reset” The TPM is now enabled.
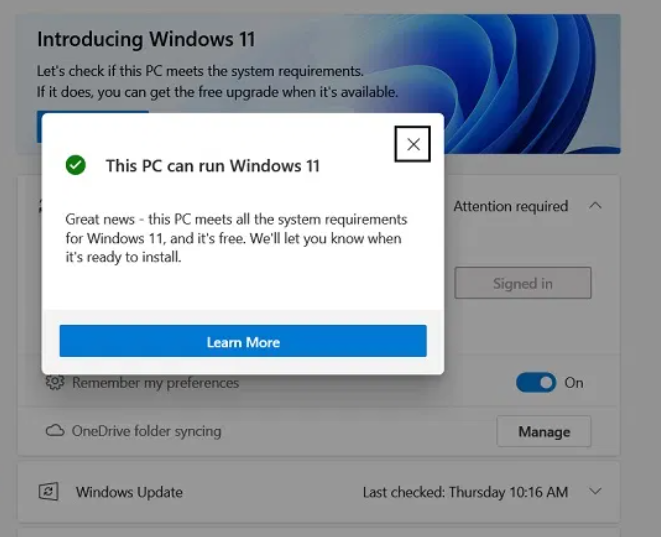
Restart the system and run the compatibility check using Microsoft’s PC Health Check Tool again. The chances are your system will now eligible for Windows 11 upgrade.
What is a TPM good for?
IF YOU’RE CURIOUS, the TPM uses both software and hardware to store and protect essential passwords and encryption keys. Plus, if a TPM chip detects something wrong in your system, it can run a quarantine mode to try and fix the problem. Read our post here.